Making the perfect Pate Brisse (pie crust) has been one of those things that has been hit or miss for me, I love to bake, but pie crust has proved my nemesis. That is, until this method taught me the art of the perfect pie crust, every time.
Former Technical Advisor, Chef Benoit Gelinotte has long been a resource and he gives amazing advice, on both the sweet and salty side of the Kitchen. “The trick to a perfect Pate Brisse is incorporating the butter with the flour. If it’s well blended, it will be perfect every time.” ~ Chef Benoit
Perfect Pate Brisse (pie crust)Technique
Timeless advice, he learned it from his Grandmother (a French Chef in her own right), and put it into to practice in his years of schooling and the twenty years in the kitchen since. As he prepared a beautiful Tarte a l’Alsacienne (Apple Custard Pie), I hovered over his shoulder to capture his technique and share it with you so for perfect Pate Brisse /Pie Crust, every time.
Nothing like a good refresher course to really nail it. When it comes to Pate Brisee, just stick with what works.
Ingredients You’ll Need for Pate Brisee / Pie Crust
Super simple, easily accessible ingredients: flour, butter, sugar, salt and one egg. If you’re making a savoury pie, like quiche or a meat pie, skip the sugar but stick to the technique.
Stick with us, as we walk though method, step-by-step. Plus a little bonus feature; working with a pie ring. Let’s start with dough.


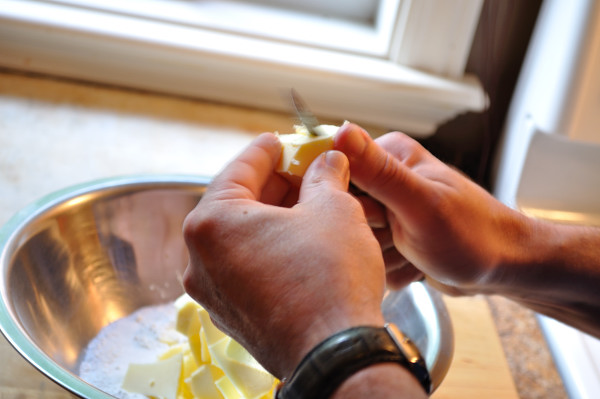
In a large mixing bowl, place the flour, salt, and sugar and lightly whisk to blend. Cut the soft butter into dry ingredients in small cubes. Pinch the butter into the flour mixture using the tips of your fingers, to blend.

As the pieces of butter breakdown, scoop the mixture between your palms and rub them together, incorporating the flour (etc) into the butter until the mixture resembles coarse meal.


Form a well in the centre of the butter mixture, add one full egg, and milk to moisten. Begin blending wet ingredients starting at the centre and working outwards, until a soft dough starts to form. Add an extra drizzle of milk if dough remains dry. Kneed lightly to bind dough into a soft mass.

Turn the dough out onto your work surface and gather it into a flat disk. Depending on the size of your pie, you can divide your dough into two equal pieces, flatten each portion into a disk, cover with plastic wrap, and refrigerate for 30 minutes to one hour before using. This chills the butter and allow the gluten in the flour to relax so your dough holds together and becomes light and flaky. (You can also freeze the dough for later use at this point if you wish.)
From here simply roll on a lightly floured surface to an even quarter inch thickness. Place gently in your pie shell and off you go.
What to up your pie game? Here’s a couple of snazzy finger moves to make a beautiful edge, and how to use a pie ring so you can get bakery-quality results in your kitchen!
How to Use a Pie Ring
Rolling a pate brisse is easy, just take it easy and slow. Once you remove the dough from the fridge you’ll find it’s cold and hard to work. Let it stand at room temperature for about ten minutes, then a couple of light bashes on the top with your rolling pin will wake that puppy right up, and start it flattening out. Flouring your surface is important, but be careful not to use too much flour as this will make your dough dry.


Rolling and Finishing
Start from the centre as you roll and work your way out, rolling with even pressure. Lift and rotate the dough as you roll, to form a rough circle about 1/4 inch thick.
Place your ring over the rolled dough and cut, leaving a two inch surplus for the edge. Prepare your pie ring and baking sheet with non-stick spray or a generous rub of butter and a light dust of flour.
To transfer the delicate pate brisse from your working surface to your waiting pie ring, gently fold over your rolling pin, and move it to the centre position over the ring. Then unroll the dough so it hangs evenly over the sides.

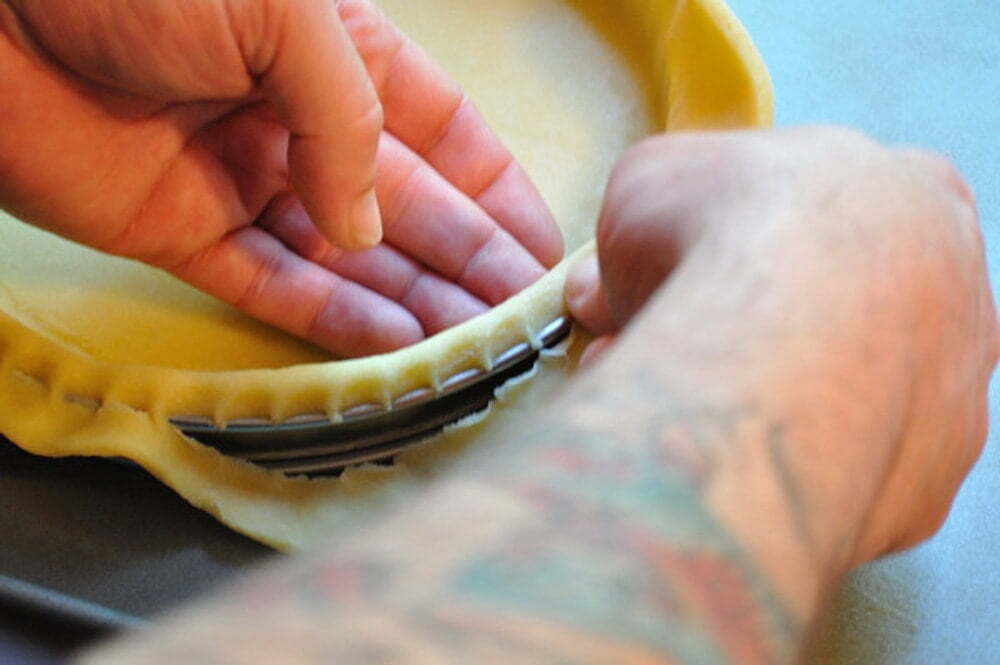
Using the tip of your finger, gently press the dough into the the bottom of the ring and up the sides, lifting the edge slightly with the other hand so that the dough does not tear. If you look closely at the photo below, you’ll see the imprint of his finger on the delicate pastry, one beside the other, as Chef Benoit turns the ring to secure the edge, using just enough pressure to shift the dough and not tear it.

Next, using just the pad of your finger, gently press the dough into the inside bottom edge, along the curve to remove any air bubbles under the dough and form a uniform bottom. Then crimp the dough with your thumb, against the edge, using your other hand as support for the dough and form a well defined edge and remove extra dough.


Once the excess is removed, pinch the edge between your fingers to raise the pie crust above the edge so you can finish with a light scalloped shape.
I always find cold hands and a cold room are your best tool when working with pastry dough. In the summer I work a dough early in the morning and if I find my hands getting too buttery, I rinse them under cold water. Refrigerating utensils or mixing bowls can also help in a hot kitchen.


The final step to preparing your pie crust in the ring is to scallop the edges, pressing the dough between your thumb and two fingers of the opposite hand along the edge to form a well defined, beautiful wavy edge on your perfect pie dough. Let’s make pie!
Pate Brisse (Pie Crust) – Recipe
Prep time: 25 minutes
Makes two 8 inch pie shells
250 grams (2 cups + 1 tablespoon) flour
160 grams (2/3 cup) butter (room temperature preferred)
1 egg ( lightly mixed)
5 grams (1 teaspoon) salt
15 grams (1 tablespoon) sugar
15 mL (1 tablespoon) milk
Non -stick spray
*Omit sugar if making a savoury pie*
Method:
1. In a large mixing bowl, place the flour, salt, and sugar and lightly whisk to blend. Cut the soft butter into dry ingredients in small cubes.
2. Pinch the butter into the flour mixture using the tips of your fingers, to blend. As the pieces of butter breakdown, scoop the mixture between your palms and rub them together, incorporating the flour (etc) into the butter until the mixture resembles coarse meal.
3. Form a well in the centre of the butter mixture, add one full egg, and milk to moisten. Begin blending wet ingredients starting at the centre and working outwards, until a soft dough starts to form. Add an extra drizzle of milk if dough remains dry. Kneed lightly to bind dough into a soft mass.
4. Turn the dough out onto your work surface and gather it into a flat disk. Depending on the size of your pie, you can divide your dough into two equal pieces, flatten each portion into a disk, cover with plastic wrap, and refrigerate for 30 minutes to one hour before using. This chills the butter and allow the gluten in the flour to relax so your dough holds together and becomes light and flaky. (You can also freeze the dough for later use at this point.)
5. Preheat your oven to 350*F (240*C). Prepare your pie shell, evenly coating with non-stick spray. Remove dough from refrigerator. Allow to stand at room temperature for about 10 minutes. Remove it from the plastic wrap and give it a couple of bashes with the heel of your hand or a rolling pin to wake it up, then using a rolling pin, roll dough on a lightly floured surface. Turn as needed to ensure even distribution – to a quarter inch thickness. Place gently in your prepared pie shell. Gently tuck the bottom against your pan with the tips of your fingers, or knuckle.
6. Baking options: Top, fill and bake at 350*F (240*C) for fruit pies. Par bake at 350*F (240*C) for 10 to 15 minutes for savoury pies. Pierce shaped dough lightly with a fork across the bottom then fully bake at 350*F (240*C) for approximately 20 – 25 minutes for custard or cream filled pies, like Lemon Meringue.
Pro Tip: If you find your dough becoming dry and brittle because you’ve used too much flour on the rolling surface, scrape it all back into a ball, dampen your hands with water and pat the surface of the dough to re-hydrate kneed lightly a few times and start to roll again. If you do this one than once, you may have to rest the dough again (for 10 minutes or so) as you will have added gluten back to the rested dough and it will resist efforts to work it, and be tough and thick as a result.
Go Forth. Bake pie.